• Graphite, Charcoal, Pastel
    • Oil Paintings
    • Military experience art
  • Artist Statement
    • Pets
    • Kid Photos
    • Family Photos
    • Couples
    • Travel and Nature
  • Photo Blog
  • Media
  • Contact
Menu

Single-Handed Arts, LLC

Fine Arts and Photography Services
  • Fine Art
    • Graphite, Charcoal, Pastel
    • Oil Paintings
    • Military experience art
  • Artist Statement
  • Photography
    • Pets
    • Kid Photos
    • Family Photos
    • Couples
    • Travel and Nature
  • Photo Blog
  • Media
  • Contact
×
IG - July 28, 2022 Post.jpg
IG - July 28, 2022 Post-2.jpg
IG - July 28, 2022 Post-3.jpg
IG - July 28, 2022 Post-4.jpg
IG - July 28, 2022 Post-5.jpg
IG - July 28, 2022 Post-6.jpg
IG - July 28, 2022 Post.jpg IG - July 28, 2022 Post-2.jpg IG - July 28, 2022 Post-3.jpg IG - July 28, 2022 Post-4.jpg IG - July 28, 2022 Post-5.jpg IG - July 28, 2022 Post-6.jpg

Working with teenagers.

Joshua Hubbell July 28, 2022

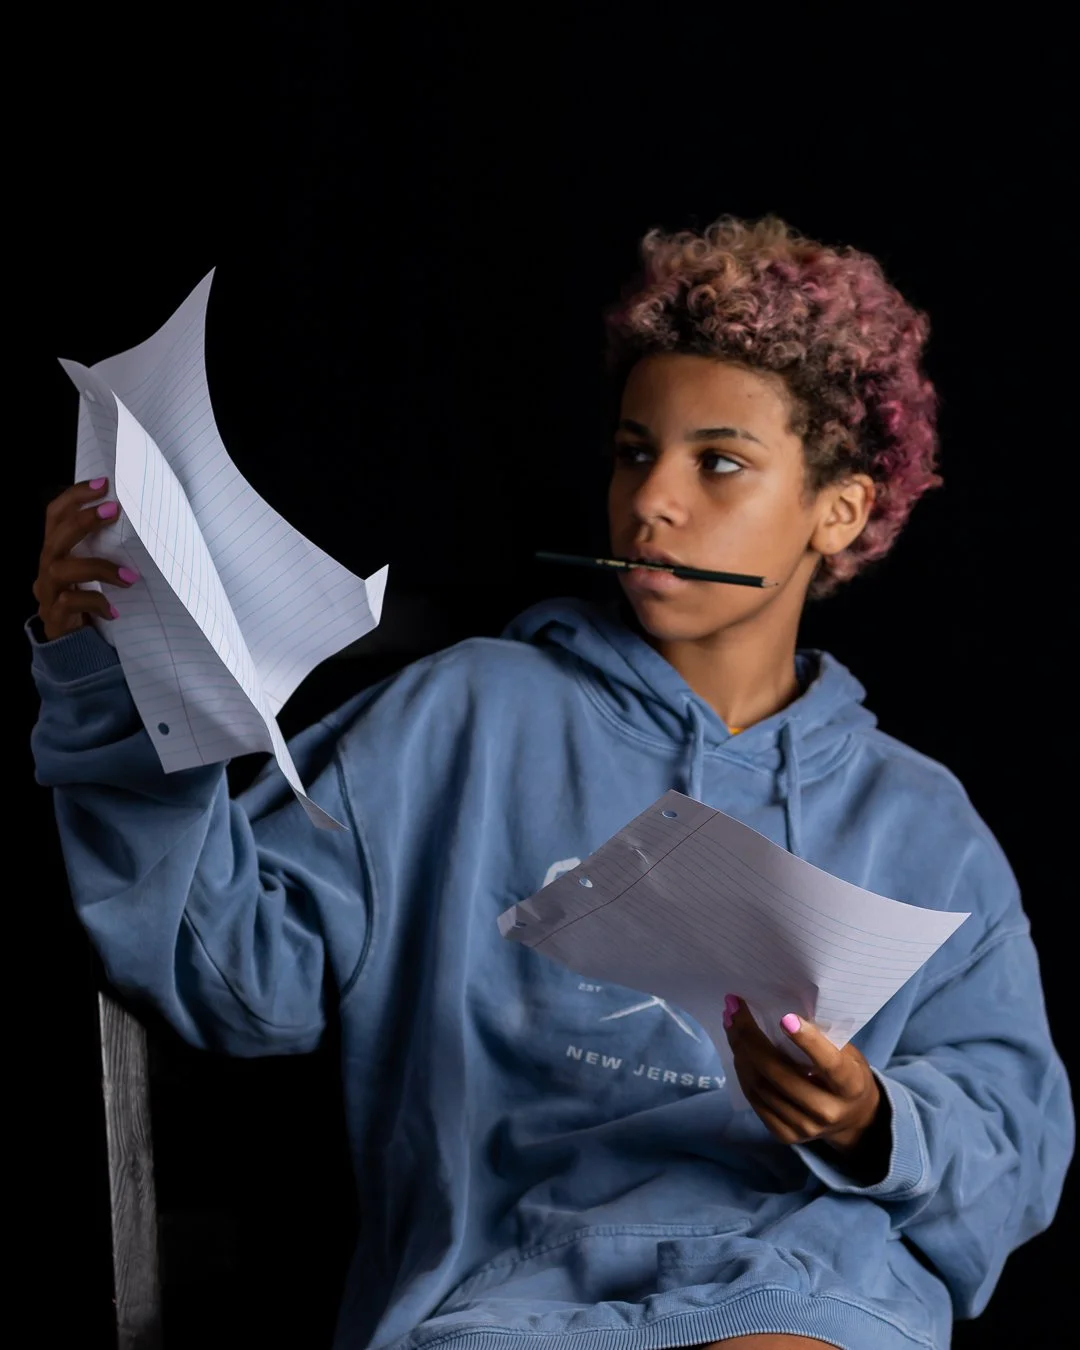
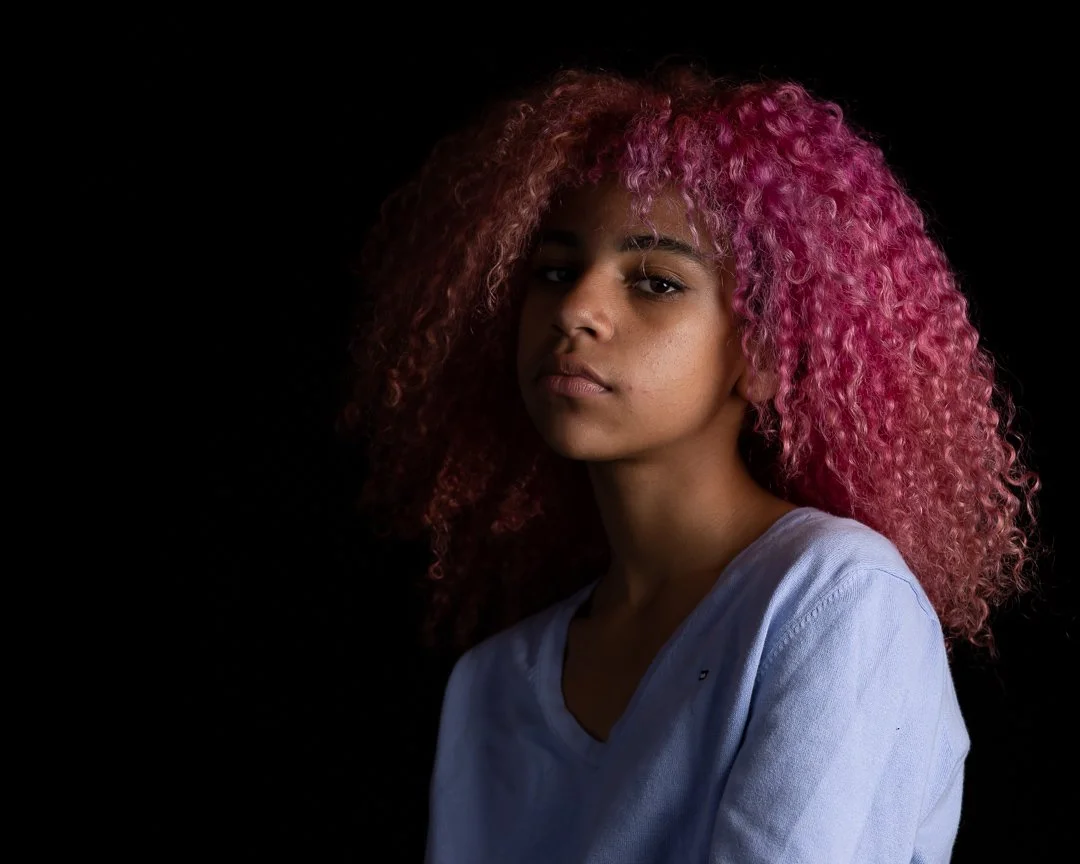
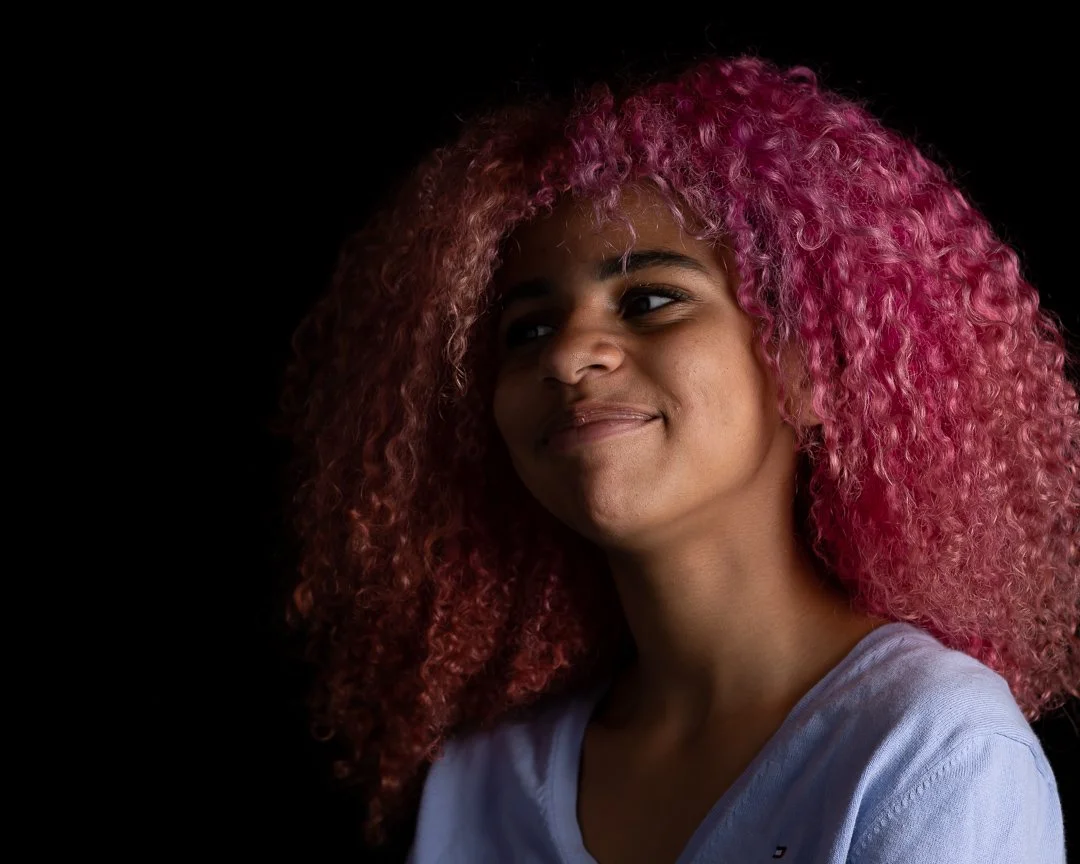
Posing teenagers is a little trickier as they tend to be more self-conscious. Trickier but not impossible. What you need to do is to pull off a good photo early in the session to build trust. If they aren’t in for a smile, and most teenagers aren’t, skip right over it and go with a serious look.  You can go back for smiles after you build that trust, but your first goal is cranking out a photo that makes them look cool.


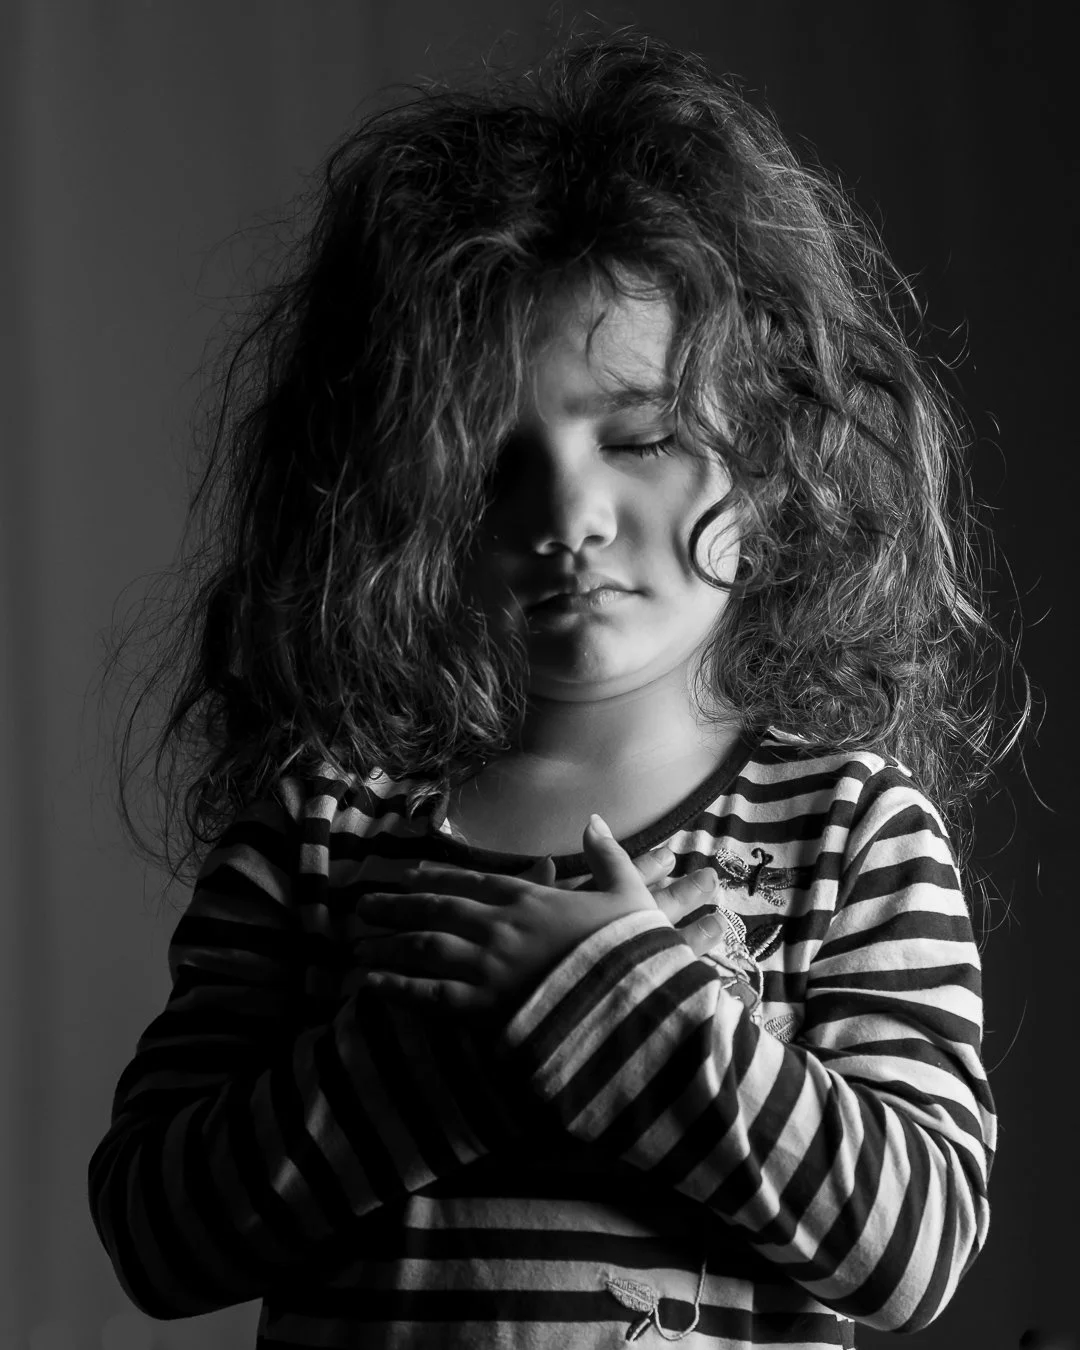
To do this, go with the basic rule first: “Neck like a giraffe and chin down a hair.” After that have them fold their arms. Alternatively, you can have them swing their arms side to side very slowly. Either of these give the arms something to do and makes the body look more fluid and less stiff. Stiff limbs look awkward, loose limbs looks relax and improves your odds of some solid shots.


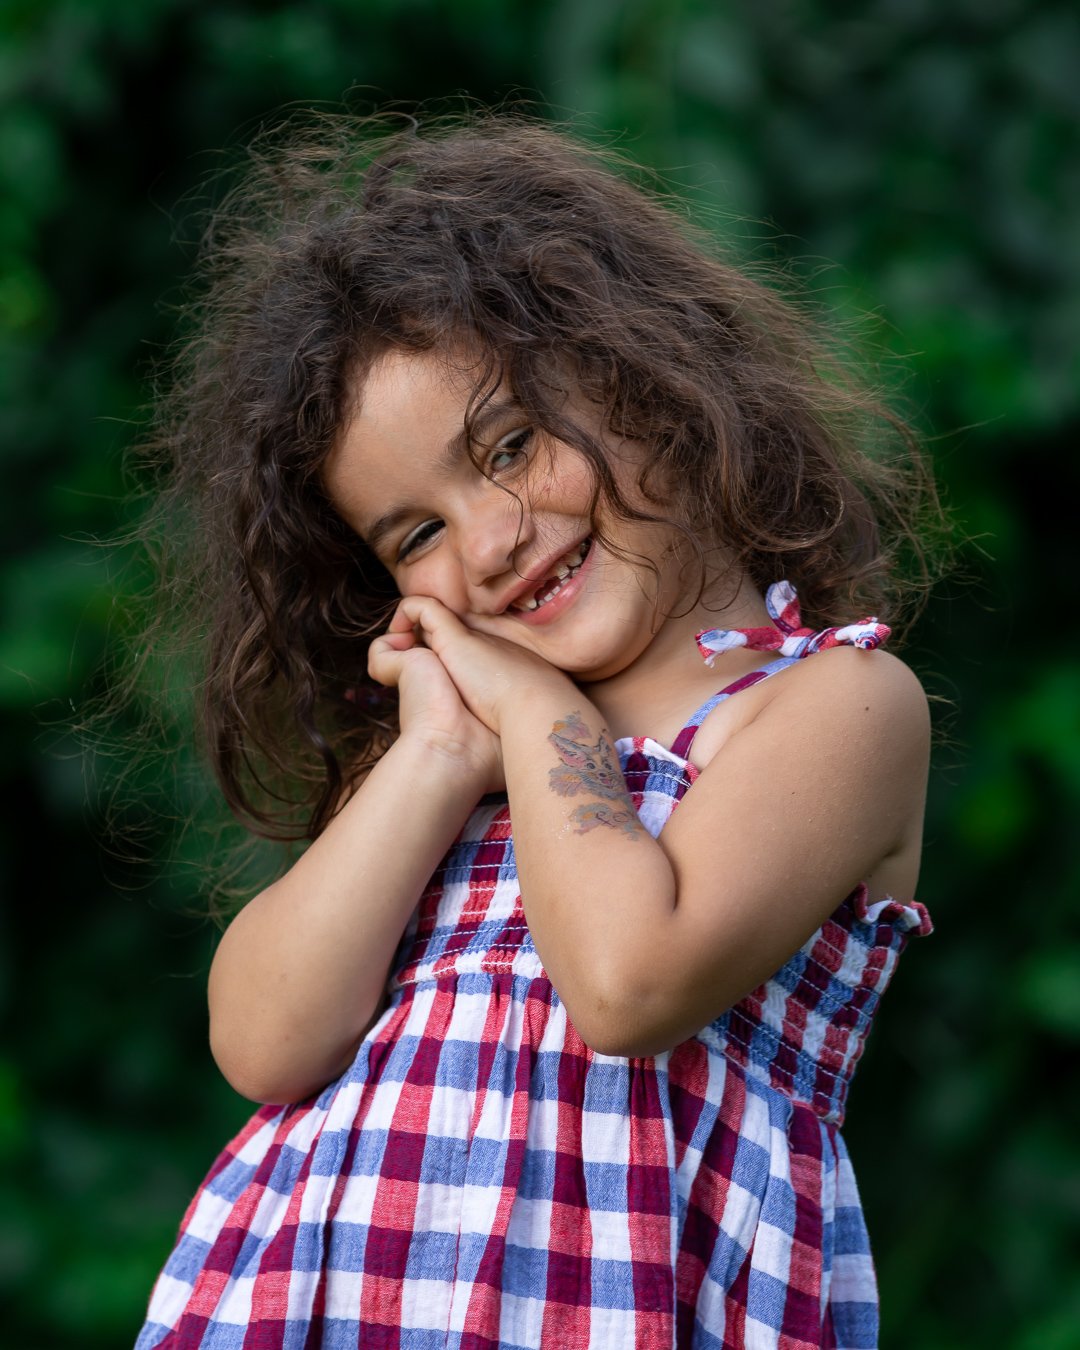
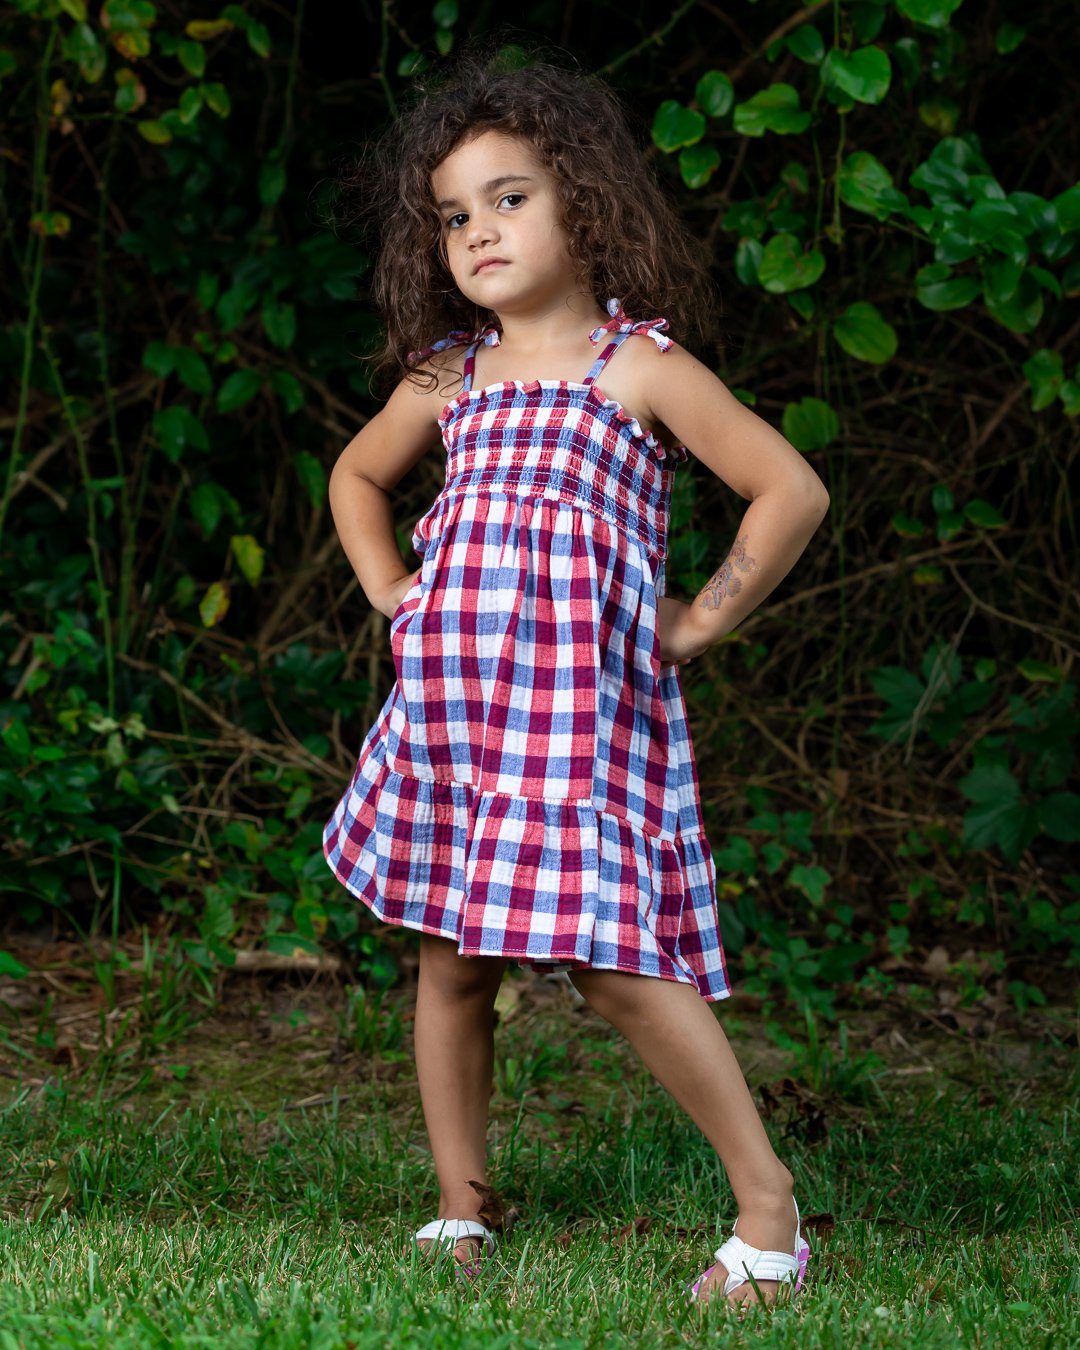
 Finally, notice again the clothing. Simple designs. Sure, you can mix them together into something more complicated but so long as it is a mix of solid colors or simple patterns. Anything else and you risk losing your composed image to the complex and distracting clothing.

Comment
IG - July 26, 2022 Post-2.jpg
IG - July 26, 2022 Post-3.jpg
IG - July 26, 2022 Post-4.jpg
IG - July 26, 2022 Post-5.jpg
IG - July 26, 2022 Post-6.jpg
IG - July 26, 2022 Post-7.jpg
IG - July 26, 2022 Post-8.jpg
IG - July 26, 2022 Post-2.jpg IG - July 26, 2022 Post-3.jpg IG - July 26, 2022 Post-4.jpg IG - July 26, 2022 Post-5.jpg IG - July 26, 2022 Post-6.jpg IG - July 26, 2022 Post-7.jpg IG - July 26, 2022 Post-8.jpg

Posing younger children.

Joshua Hubbell July 26, 2022

4-year-olds are a little better at posing directions but are still very young that they may not understand everything you are trying to say. But often times they will give you their best interpretation of what you are trying to get them to do and often times that is a much better pose because it catches their personality with it. So don’t get so hung up on getting the pose correct when you can get the solid gold of a pose that catches who they are even better then the pose you had in mind.


One other thing, that I will likely reiterate or at least repeat on the next post: clothing. Keep it simple. Either patterns or solid colors or a mix of patterns and solid colors but you don’t want complicated designs. Simple colors or simple patterns look great in photos. That shirt you have that has that long winded speech on it is just going to end up distracting everyone as they try to read your shirt.

Comment
IG - July 21, 2022 Post.jpg
IG - July 21, 2022 Post-2.jpg
IG - July 21, 2022 Post-3.jpg
IG - July 21, 2022 Post-4.jpg
IG - July 21, 2022 Post-5.jpg
IG - July 21, 2022 Post-6.jpg
IG - July 21, 2022 Post-7.jpg
IG - July 21, 2022 Post.jpg IG - July 21, 2022 Post-2.jpg IG - July 21, 2022 Post-3.jpg IG - July 21, 2022 Post-4.jpg IG - July 21, 2022 Post-5.jpg IG - July 21, 2022 Post-6.jpg IG - July 21, 2022 Post-7.jpg

More of that intended 4th of July photosession.

Joshua Hubbell July 21, 2022

So, we stepped it up a notch with my assistant by throwing in a flag and moving one of the lights.


For the light setup, I went with the octagon softbox up front and a speedlight in back with a regular reflector on pointed directly facing the back of the subject. This was to bring out the flag given the way we were using it for this photo session.


Initially, my subject and then subjects were just posing with the flag in various ways, but then got the flag to fly up. There is no complicated trick to this. I simply had one of my subjects grab the other end and gentle toss it up into the air and gravity did the rest of the work. I timed my shot and after a few attempts I had a subject wrapped in one end of the flag with the other end flying in the air. Light positioning helped but if you did this outside during the day, you might have an easier time.


Remember, you can do things with the props you have, just consider what they normally do and try and do something along those lines. Nothing we did here is new or groundbreaking, but the shots turned out and that means they can turn out for you too.

Comment
IG - July 19, 2022 Post.jpg
IG - July 19, 2022 Post-2.jpg
IG - July 19, 2022 Post-3.jpg
IG - July 19, 2022 Post-4.jpg
IG - July 19, 2022 Post-5.jpg
IG - July 19, 2022 Post-6.jpg
IG - July 19, 2022 Post.jpg IG - July 19, 2022 Post-2.jpg IG - July 19, 2022 Post-3.jpg IG - July 19, 2022 Post-4.jpg IG - July 19, 2022 Post-5.jpg IG - July 19, 2022 Post-6.jpg

The July 4th photos I intended to do.

Joshua Hubbell July 19, 2022

Here are some of the photos I wanted to do for July 4th, unfortunately we had to do them a week and a half later since I had covid. You see all those USA things in Walmart and the Dollar Store? Yeah, those make great props for photos for the 4th of July. They also make for an easy low budget photo session. So, I grabbed those and went, after recovering, I went to work.


As always, when working with babies, you are at their mercy. Work with their parents to figure out what tricks might get the responses you need but keep it simple. For example, looking in a direction and maybe smiling but settle for just getting the proper direction. Also be open to other behaviors their parents may be aware of like how this one-year-old likes standing up and holding the back of the chair. That works so we went with it. But the point is, and I know I sound like a broken record at this point, but the point is that information is key and the best source of information for a baby are the people the baby has spent pretty much all their existence with up to this point.


Also keep in mind that if you use sunglasses, they will reflect the light. If you set your lights at a 45-degree angle to the sunglasses but good luck keeping that direction perfect with a baby.


We then moved into something more but that’s next post.

Comment
IG - July 15, 2022 Post.jpg
IG - July 15, 2022 Post-2.jpg
IG - July 15, 2022 Post-3.jpg
IG - July 15, 2022 Post-4.jpg
IG - July 15, 2022 Post-5.jpg
IG - July 15, 2022 Post-6.jpg
IG - July 15, 2022 Post-7.jpg
IG - July 15, 2022 Post-9.jpg
IG - July 15, 2022 Post-10.jpg
IG - July 15, 2022 Post-8.jpg
IG - July 15, 2022 Post.jpg IG - July 15, 2022 Post-2.jpg IG - July 15, 2022 Post-3.jpg IG - July 15, 2022 Post-4.jpg IG - July 15, 2022 Post-5.jpg IG - July 15, 2022 Post-6.jpg IG - July 15, 2022 Post-7.jpg IG - July 15, 2022 Post-9.jpg IG - July 15, 2022 Post-10.jpg IG - July 15, 2022 Post-8.jpg

A Rocking Photo Session

Joshua Hubbell July 15, 2022

I intended for another set of photos for this post, but my assistant really wanted me to get these done first so here we are.


My assistant saw this guitar and immediately got inspired for a rocking session outfit. So, while she was getting ready, I was setting up the lighting for it. I ultimately went with one speedlight overhead with a snoot aimed down this would give more of a performance look. However, that light alone would just create shadows everywhere below her head, so I also threw in a strobe with an octogon softbox. I didn’t want to wash out the overhead light, so I dropped the octagon softbox low, aimed up, and had it set low. This created a nice fill light without overtaking the overhead light.


For posing, she just sorts of got in character and played around. She did look at me like I was crazy when I told her to jump with it, but she went for it. Had I noticed the platform shoes I probably wouldn’t have suggested the jump, but it happened and it worked out well. The rest were pretty easy “act like your playing” and she had seen the Elvis movie recently, so I told her steal some of his moves and she went for it.


Finally, I also wanted to be sure to get the instrument. A good rule of thumb when working with artists is that you also capture the tools of their trade as they often have as much character as your human subjects, and I can pretty much guarantee your human subjects will appreciate that you went that extra mile. Give their tools a closeup or two as well.  

Comment
IG - July 11, 2022 Post-2.jpg
IG - July 11, 2022 Post-3.jpg
IG - July 11, 2022 Post-6.jpg
IG - July 11, 2022 Post-4.jpg
IG - July 11, 2022 Post-5.jpg
IG - July 11, 2022 Post.jpg
IG - July 11, 2022 Post-2.jpg IG - July 11, 2022 Post-3.jpg IG - July 11, 2022 Post-6.jpg IG - July 11, 2022 Post-4.jpg IG - July 11, 2022 Post-5.jpg IG - July 11, 2022 Post.jpg

Practice photography types outside of your wheelhouse.

Joshua Hubbell July 11, 2022

Sorry about the break. I had the pleasure of having Covid.


Here are some nature shots I did a few weeks ago. Nature photography isn’t something I do a whole lot but I do it from time to time. I don’t really see myself profiting  


If photography is something you are interested in, then you should be trying out other types of photography every now and then. You don’t need to approach them as a professional, amateur is fine, but the point is to try them. Attempting other types of photography forces you to use the photography skills you already have in a different way and uses your whole photography chain in a different way as well. Suddenly your standards for composing a shot have to be adjusted and you might utilize other features of your processing tools then you normally use.


In short, attempting other types of photography forces your photography to grow because you are using your current skills and knowledge in a different way.  I also like to try different types of photography when I feel I am having a creative block or feel my work is getting stagnant. Something about it just helps me move forward from these places.


Plus, you get the photos from those other types of photography you try and who knows they might come in handy. I’ve referenced a few for backdrops in other photos and I like to use my nature shots as digital album covers when delivering work to clients.


#marylandphotographer #annearundelphotographer #photographytips

Comment
IG - June 30, 2022 Post.jpg
IG - June 30, 2022 Post-2.jpg
IG - June 30, 2022 Post-3.jpg
IG - June 30, 2022 Post-4.jpg
IG - June 30, 2022 Post-5.jpg
IG - June 30, 2022 Post-6.jpg
IG - June 30, 2022 Post-7.jpg
IG - June 30, 2022 Post.jpg IG - June 30, 2022 Post-2.jpg IG - June 30, 2022 Post-3.jpg IG - June 30, 2022 Post-4.jpg IG - June 30, 2022 Post-5.jpg IG - June 30, 2022 Post-6.jpg IG - June 30, 2022 Post-7.jpg

Even more single light work.

Joshua Hubbell June 30, 2022

More single light work, just to add more detail to the previous post.


In this shot I am again using a strobe with an octagon softbox and a reflector as a fill light. This time positioning. Look at the pictures of my subject holding up the paper. In one, the subject is blocking the light creating a shadow across her face and reducing the fill light all in one motion. I am not going to say this is wrong, it might be an effect you might want but it is something to consider – props can modify your light so keep that in mind when posing with light. In the next photo we changed the direction she is holding the paper up. Now the light can hit her, and the paper even acts as a slight fill light.


Again, it is only right or wrong depending on what you are trying to do with your shot.


For the last two we got a little fun threw some paper into the air. Initially I had my subject do it but it was tricky to get the best direction. So, I recruited someone to stand on a step ladder and throw the paper… and it was still tricky to get the best direction. After a little trial and error things worked out.

Comment
IG - June 28, 2022 Post.jpg
IG - June 28, 2022 Post-2.jpg
IG - June 28, 2022 Post-3.jpg
IG - June 28, 2022 Post-4.jpg
IG - June 28, 2022 Post-5.jpg
IG - June 28, 2022 Post-6.jpg
IG - June 28, 2022 Post.jpg IG - June 28, 2022 Post-2.jpg IG - June 28, 2022 Post-3.jpg IG - June 28, 2022 Post-4.jpg IG - June 28, 2022 Post-5.jpg IG - June 28, 2022 Post-6.jpg

Single light with a reflector session

Joshua Hubbell June 28, 2022

Here is another quick one. This was a single light set up. I used a strobe with an octagon softbox as the key light and I used the white side of a reflector as a key light by bouncing some of the key light back on to the subject. One of these days I will remember to photograph the set up so I can show exactly what I did but that day isn’t today apparently.


Anyway, when using a reflector try to visualize where you need your reflector to be to best reflect the light. For example, if you want a fill light under the chin, then you need to place the reflector in a way that will make that happen while also being sure that the light you are reflecting is actually going to hit the reflector so it can do what you want it to do. It does make fill lighting a little trickier but remember you can move the reflector and the light source if you are using artificial light. It is a placement puzzle.


A few other quick tips, as always, most places that sell fabric usually have a precut section that has a random assortment of fabric cut to 3 yards and 2 yards. These make for great props in photography. In this session she was naturally drawn to the shiny goldish fabric, so we went with that.  Also, and totally unrelated, when using minimal lighting the photos usually convert to grayscale rather well.

Comment
IG - June 21, 2022 Post.jpg
IG - June 21, 2022 Post-2.jpg
IG - June 21, 2022 Post-3.jpg
IG - June 21, 2022 Post-4.jpg
IG - June 21, 2022 Post-5.jpg
IG - June 21, 2022 Post-6.jpg
IG - June 21, 2022 Post-7.jpg
IG - June 21, 2022 Post-8.jpg
IG - June 21, 2022 Post-9.jpg
IG - June 21, 2022 Post-10.jpg
IG - June 21, 2022 Post.jpg IG - June 21, 2022 Post-2.jpg IG - June 21, 2022 Post-3.jpg IG - June 21, 2022 Post-4.jpg IG - June 21, 2022 Post-5.jpg IG - June 21, 2022 Post-6.jpg IG - June 21, 2022 Post-7.jpg IG - June 21, 2022 Post-8.jpg IG - June 21, 2022 Post-9.jpg IG - June 21, 2022 Post-10.jpg

In studio dance photos.

Joshua Hubbell June 21, 2022

I was able to work with a talented dancer in studio. These were a from a few months back. I enjoy working with other artists, especially from other crafts. Regardless of what craft you may be photographing the first tip you should always start with is do research. First of what craft you are photographing and what direction your subject has gone with their craft. This order is crucial because you aren’t going to be able to ask your subject questions and understand the answers if you don’t know the very basics of the subject matter. Research will also help you understand what poses you might want to try as well.


Next up, get that shutter speed as fast as you can. In this case, I opted to use a mix of my studio lights. Some of the strobes I used here lacked a high-speed sync option so that limited my shutter speed to 1/250 of a second. Any higher and I’d get light sync issues.


Finally, try a variation of looks and poses. Obviously, you want poses that are related to the craft involved but they don’t have to all look super happy. Remember, when artists work, despite all the enjoyment they get out of their craft, they likely take their work seriously. So do some serious shots too. It will compliment your subject and respect their craft.

Comment
IG - June 14, 2022 Post.jpg
IG - June 14, 2022 Post-2.jpg
IG - June 14, 2022 Post-3.jpg
IG - June 14, 2022 Post-4.jpg
IG - June 14, 2022 Post-5.jpg
IG - June 14, 2022 Post-6.jpg
IG - June 14, 2022 Post-7.jpg
IG - June 14, 2022 Post-8.jpg
IG - June 14, 2022 Post.jpg IG - June 14, 2022 Post-2.jpg IG - June 14, 2022 Post-3.jpg IG - June 14, 2022 Post-4.jpg IG - June 14, 2022 Post-5.jpg IG - June 14, 2022 Post-6.jpg IG - June 14, 2022 Post-7.jpg IG - June 14, 2022 Post-8.jpg

Actress Headshots

Joshua Hubbell June 14, 2022

Some more Actress headshots, keep an eye out for this young lady as you will likely see her again soon on a different medium. And probably often.


When doing actor/actress headshots the always find out if they have an agent or are approaching an agent and find out what the agent’s standards are for headshots. Different agents will have different standards and you want to work within whatever the current agent demands. It may seem like these agents are pulling standards out of a hat, but they really aren’t. They just know what the casting directors they communicate with on a regular basis want and tailor their headshot standards to that. So, an agent in constant contact with one set of casting directors may have one standard for them but a different agent working with a different set of casting directors may have a different standard. That’s just how it goes.


And don’t be disappointed if they don’t pick the picture you think is the one. These agents know what their circles want and tailor their decisions to that. Remember, it isn’t personal, it is business.

Comment
IG - June 7, 2022 Post.jpg
IG - June 7, 2022 Post-2.jpg
IG - June 7, 2022 Post-3.jpg
IG - June 7, 2022 Post-4.jpg
IG - June 7, 2022 Post-5.jpg
IG - June 7, 2022 Post-6.jpg
IG - June 7, 2022 Post-7.jpg
IG - June 7, 2022 Post-8.jpg
IG - June 7, 2022 Post-9.jpg
IG - June 7, 2022 Post-10.jpg
IG - June 7, 2022 Post.jpg IG - June 7, 2022 Post-2.jpg IG - June 7, 2022 Post-3.jpg IG - June 7, 2022 Post-4.jpg IG - June 7, 2022 Post-5.jpg IG - June 7, 2022 Post-6.jpg IG - June 7, 2022 Post-7.jpg IG - June 7, 2022 Post-8.jpg IG - June 7, 2022 Post-9.jpg IG - June 7, 2022 Post-10.jpg

Parks are your friend!

Joshua Hubbell June 7, 2022

These photos were done for a wonderful client in celebration of completing grad school. The park we agreed on was Kinder Farm Park which was a great decision and a location I will try to get clients out to again sooner rather than later.


Parks are your friend. I repeat parks are your friend. Often they have numerous angles you can approach a photo session from while still delivering a wide variety of backgrounds and space, so you aren’t pushed out by crowds or even other photographers. That stated there are some things to keep in mind when working on parks. First and foremost – you want to understand if you need to get a permit and if so, how to do so. This will take research on your part and your milage will vary as not all parks make it clear as day what their professional photography policies are. Second, even with a permit you and your clients are on the park property as guests. Everyone else on the park property has just as much right to be there as you so just be patient if an area you want is occupied or better yet go some where else and check back later.


As for the session itself, gates, walls, trees, and benches are all great places to start. I should probably take a step back here and explain; you will know where these are as you will arrive early just to reality check everything and plan your path. It is a lot easier to keep momentum in a photo session if you know where you are going. You can do a point A to point B approach or a big loop but just be sure you have a few stop off points for photos and enough so you can be flexible in case one of your spots is occupied by the time you get there.


Finally, when you are doing the photo session, check the backgrounds. You might need to adjust angles to avoid having to edit out distracting background objects or people. Modern photo processing software is amazing but the less time you have to spend on it, the better as the faster you can return the photos to your client. That stated, it isn’t a race, you want to spend just enough time on them to do the job right but not so much time on them that you start to see imaginary flaws because you are overly focused on stuff no one but you will ever see.

Comment
IG - June 2, 2022 Post-6.jpg
IG - June 2, 2022 Post.jpg
IG - June 2, 2022 Post-2.jpg
IG - June 2, 2022 Post-4.jpg
IG - June 2, 2022 Post-3.jpg
IG - June 2, 2022 Post-6.jpg IG - June 2, 2022 Post.jpg IG - June 2, 2022 Post-2.jpg IG - June 2, 2022 Post-4.jpg IG - June 2, 2022 Post-3.jpg

Faking golden hour.

Joshua Hubbell June 2, 2022

I met my subject’s parents very early one morning and we had her jump in the pool.  Afterall, all kids love getting up super early to get an incredible morning golden hour light. Unless I made it up, which I did. These photos were taken in the afternoon and not only that they were taken on a cloudy day.


The golden light is just a strobe with a gel on and cranked up to spread golden light everywhere. You can even see the set up with the one without the light. There are two tripods because I was switching out the between the medium sized one and the small sized one for various shots. Anyway, a good strobe with a good gel can fake a golden hour. Granted, you probably don’t want one so cranked up as this one for more realistic shots, but it is definitely a good crutch if you can’t get the golden hour you want – you just have to understand how to make it happen with the gear you have. Different strobes and speedlights will manage this sort of goal to different degrees and you will have to work within those limits to make what you want to have happen, happen.


But that’s just photography, and art for that matter, in general; figuring out how to make what you want with what you got.

Comment
May 25, 2022 Bella.jpg
May 25, 2022 Bella-3.jpg
May 25, 2022 Bella-4.jpg
May 25, 2022 Bella-5.jpg
May 25, 2022 Bella-6.jpg
May 25, 2022 Bella.jpg May 25, 2022 Bella-3.jpg May 25, 2022 Bella-4.jpg May 25, 2022 Bella-5.jpg May 25, 2022 Bella-6.jpg

Backdrop practice.

Joshua Hubbell May 31, 2022

This will be a quick one because I did a few really cool photo sessions recently that I need to finish processing. And good news – I got permission to use some of them so we can do a few photography tips from some awesome client sessions. The cool thing about processing is when you know you did a great job with the photo session and already know the client is going to be happy with the end results.


But for today, back drops. I’ve been toying with some ways to make my backdrops a little more interesting without stealing the show. These photos here were for actress headshots… which ended up not working out because the talent agent wanted a simpler background. That’s okay, just a little aside here but if you are doing actor/actress headshots you go with what the talent agent and casting director says – always.


Anyway, I have a brick backdrop that looks great on its own, but I went ahead and flung some cloth over it too. I think I’ve mentioned this before, but Walmart and more fabric stores have a section with precut yards of random fabric usually at a discount. This stuff is AWESOME. You can make fake wall drapes out them and wrap them around your subject for fake cloths. If the fabric is thin enough, you can shoot through it or even put it in front of your flash to give it some color. There is just so much you can do.


However, make sure your backdrop doesn’t take away focus from your subject. It should compliment your subject; not take away attention from your subject. If you make your backdrop too busy you will lose your subject and end up with a cluttered mess of a photo.

Comment
May 22, 2022 Victoria with flower-3.jpg
May 22, 2022 Victoria with flower-4.jpg
May 22, 2022 Victoria with flower.jpg
May 22, 2022 Victoria with flower-2.jpg
May 22, 2022 Victoria with flower-7.jpg
May 22, 2022 Victoria with flower-9.jpg
May 22, 2022 Victoria with flower-6.jpg
May 22, 2022 Victoria with flower-10.jpg
May 22, 2022 Victoria with flower-11.jpg
May 22, 2022 Victoria with flower-3.jpg May 22, 2022 Victoria with flower-4.jpg May 22, 2022 Victoria with flower.jpg May 22, 2022 Victoria with flower-2.jpg May 22, 2022 Victoria with flower-7.jpg May 22, 2022 Victoria with flower-9.jpg May 22, 2022 Victoria with flower-6.jpg May 22, 2022 Victoria with flower-10.jpg May 22, 2022 Victoria with flower-11.jpg

Mid-Day Sun Tips

Joshua Hubbell May 24, 2022

Midday photos can be tricky. The sun pouring down overhead makes for some very unflattering shadows and harsh light. To mitigate this, try finding some shade and shooting there. While in that shade that is a perfect time to pull out your flash to fill in some shadows. Alternatively, you can get a reflector and reflect some light onto your subject. In this case, we did all three. First, we found some shade, then I set up a strobe for the key lighting and, finally, that white sheet is acting as a reflector.

After that we set up a few more props – a basket, a vase, and some fake flowers, and then we let the baby be a baby. She first explored the immediate setup and then had fun tearing things apart. Keep that in mind; babies enjoy exploring and destruction so keep your props safe with that in mind. But this setup can work for pretty much anyone and if the shady area is thin enough you can use that harsh light as a back light to help bring your subjects out.

Comment
IG - May 17, 2022 Post.jpg
IG - May 17, 2022 Post-2.jpg
IG - May 17, 2022 Post-3.jpg
IG - May 17, 2022 Post-4.jpg
IG - May 17, 2022 Post-5.jpg
IG - May 17, 2022 Post-6.jpg
IG - May 17, 2022 Post.jpg IG - May 17, 2022 Post-2.jpg IG - May 17, 2022 Post-3.jpg IG - May 17, 2022 Post-4.jpg IG - May 17, 2022 Post-5.jpg IG - May 17, 2022 Post-6.jpg

Turn Things Around!

Joshua Hubbell May 17, 2022

So, I took the bench from the previous session, turned it around, and used it again. You can do this with chairs and especially with benches out in parks to give your photos a more dynamic look. In fact, you should try walking around the bench or chair and viewing it from different angles. Also notice that by doing it this way, we give their hands something to do – which is something I am always repeating myself on: give those hands something to do. And it didn’t take something fancy to give those hands something to do, we just changed the angle is all.


This time, we are demonstrating how to position heads when working with a family. There are two things that I like to include that work well. First, bring those heads together. You’ll get a smile at some point doing this and it shows closeness and family. Second, have one subject look at the other or even have the subjects look at each other. In this case, the baby is going to look where the baby looks. So, I had her older sister look at her and we ended up with some pretty good shots. That’s two easy things you can do for posing that tends to work really well with families.

Comment
IG - May 11, 2022 Post-6.jpg
IG - May 11, 2022 Post.jpg
IG - May 11, 2022 Post-2.jpg
IG - May 11, 2022 Post-3.jpg
IG - May 11, 2022 Post-4.jpg
IG - May 11, 2022 Post-5.jpg
IG - May 11, 2022 Post-6.jpg IG - May 11, 2022 Post.jpg IG - May 11, 2022 Post-2.jpg IG - May 11, 2022 Post-3.jpg IG - May 11, 2022 Post-4.jpg IG - May 11, 2022 Post-5.jpg

Two younger sisters sitting together.

Joshua Hubbell May 11, 2022

As always, when working with babies, they set the beat of the dance. If they want to look around, go with that. If you can get them to look at the camera and smile or laugh – great. If not, just go with what you can get and work from there. Just remember that everything is new to babies, and they will be looking around a lot as they take the photo session in. You just have to work through that. However, you can make things easier if you throw in another subject to work off them. Young or old, as long as that other subject interacts with the baby, things will work out.


When trying to work within the chaos, start with the eyes. If you can get both eyes, you will be helping yourself out. Getting both eyes of the baby better helps the person viewing the photo fill in what is going on. If you have to move over to get both eyes, then do that. Keep in mind that those eyes do not need to be looking at your camera. But if you can’t get both eyes for whatever reason, don’t worry too much and just get what you can.


Also keep in mind that babies do not usually sit still. So, expect lots of movement and expect to miss lots of shots. Don’t worry, they will keep moving around and you will get some shots. Just keep working at it and you will end up with something. Also, keep the session short because they don’t like to sit still usually. 30 minutes is a long time to a baby and they will get frustrated and have a melt down if you take too long.

Comment
IG - May 6, 2022 Post.jpg
IG - May 6, 2022 Post-2.jpg
IG - May 6, 2022 Post-3.jpg
IG - May 6, 2022 Post-4.jpg
IG - May 6, 2022 Post-6.jpg
IG - May 6, 2022 Post-7.jpg
IG - May 6, 2022 Post-5.jpg
IG - May 6, 2022 Post.jpg IG - May 6, 2022 Post-2.jpg IG - May 6, 2022 Post-3.jpg IG - May 6, 2022 Post-4.jpg IG - May 6, 2022 Post-6.jpg IG - May 6, 2022 Post-7.jpg IG - May 6, 2022 Post-5.jpg

Another quick post.

Joshua Hubbell May 6, 2022

I’m still working on processing so here is another quick post.


A lot of students out there are doing their preparation for their final exams, so we went with that. A few books, a notepad, a desk light, and a pair of glasses later and we had our session. The easiest part of this session is that no one is ever thrilled to study so serious looks abound. That left posing the hands to get a little variation. Remember, glasses don’t have to stay on your subject’s head and can be held or placed down in front of them.


This was done with 2 lights and a reflector. The key light was a strobe just off to the side and a reflector to fill the shadows. Since we had a lamp on the table, I put a light overhead aimed at the table with a snoot to make the lamp look like it was lighting the table. Of course, it would have helped if I removed the bulbed or turned the light on to complete the effect, but I failed to notice that. That is what this sort of practice is for though – so you can avoid mistakes like that later.

Comment
IG - May 3, 2022 Post.jpg
IG - May 3, 2022 Post-2.jpg
IG - May 3, 2022 Post-3.jpg
IG - May 3, 2022 Post-4.jpg
IG - May 3, 2022 Post-5.jpg
IG - May 3, 2022 Post-6.jpg
IG - May 3, 2022 Post-7.jpg
IG - May 3, 2022 Post.jpg IG - May 3, 2022 Post-2.jpg IG - May 3, 2022 Post-3.jpg IG - May 3, 2022 Post-4.jpg IG - May 3, 2022 Post-5.jpg IG - May 3, 2022 Post-6.jpg IG - May 3, 2022 Post-7.jpg

Single light and a reflector

Joshua Hubbell May 3, 2022

I know I mentioned in the previous post that I would go into how to photograph a tech and dress rehearsal but that takes a little more time than what I have currently, so instead here is a quick post about using a single flash and a reflector. In this scenario we are using a round reflector as a fill light and a strobe with an octagon softbox as the key light (though a speed light could have worked too).


Round reflectors come usually come with a reversible top. Usually there is a white and black side and a silver and gold side. Like 90% of the time, I use the white side and I did so here. The silver side and the gold side both reflect a lot of light back but usually it is too much for my taste – that doesn’t mean you shouldn’t utilize them. Just keep in mind that silver side and that gold side will reflect their respective colors a little. The black side is to make more shadows and reflect even less light.


The key light is just off to her side a little and the reflector is on the other side aimed at her as well. The thing to remember about reflectors is that they only reflect the light that reaches it. For this reason, I rarely use a grid when I am mixing a softbox and a reflector. In this scenario I usually want the light to go wherever because that is more light to bounce off the reflector.

Comment

This was with a two-light setup. One strobe with an octagon softbox and a grid and a speedlight. The speedlight is behind me giving me that rim light and the strobe is in front of me. We used the stage lights as a back light for this shot. I’ll go more into this next week when I write about tech and dress rehearsals.

Oh what a beutiful morning....

Joshua Hubbell April 29, 2022

My posting has switched back over to 2 a week as opposed to 3 a week. This is because I’ve been photographing tech rehearsals and dress rehearsals the last two weekends for Indian Creek School’ performance of Oklahoma!


If you have time today, Saturday, or Sunday, you should check out their performance – I promise it is a professional level. To get tickets go to https://indiancreekschool.ludus.com/index.php?show_id=17675


Or show up for a show on Friday at 7:00 PM, Saturday at 3:00 PM, or Sunday at 3:00 PM. You won’t be disappointed. The address is:


 Indian Creek School

1130 Anne Chambers Way

Crownsville, MD 21032


I’ll do a post next week giving a little more detail about how to photograph a dress rehearsal but for now, you should really check out this performance. You won’t be disappointed.

Comment
IG - April 26, 2022 Post-8.jpg
IG - April 26, 2022 Post.jpg
IG - April 26, 2022 Post-2.jpg
IG - April 26, 2022 Post-3.jpg
IG - April 26, 2022 Post-4.jpg
IG - April 26, 2022 Post-5.jpg
IG - April 26, 2022 Post-6.jpg
IG - April 26, 2022 Post-7.jpg
IG - April 26, 2022 Post-8.jpg IG - April 26, 2022 Post.jpg IG - April 26, 2022 Post-2.jpg IG - April 26, 2022 Post-3.jpg IG - April 26, 2022 Post-4.jpg IG - April 26, 2022 Post-5.jpg IG - April 26, 2022 Post-6.jpg IG - April 26, 2022 Post-7.jpg

Gray Scaling Photos

Joshua Hubbell April 26, 2022

Sometimes things don’t work out. I was testing out a technique to work with ambient light that I clearly had no handle on. That happens sometimes but fortunately processing tools come with cropping capabilities. Having the option to crop is awesome, but ideally you should try to not need it if possible. The less you have to crop during processing the more time you have to spend towards somewhere else.


Since my subject was showing a range of emotion, I just went with that. And since she had a flair for the dramatic, I went with grayscale for some of them. Gray scaling things reduces detail which amplifies the rest of the detail that is left behind. In this case, emotion is amplified. That stated, the busier a picture is the less effective gray scaling has on them.


For this set up I think it was just a single strobe with a softbox and grid on. I was waiting around before I headed off for a dress rehearsal, so I didn’t want to unpack all my gear. I kept it simple and attempted to work that previously mentioned ambient light technique. I’ll need to practice that more before I can go into it though.

Comment
← NewerOlder →

Search Posts

Powered by Squarespace